Saturday, December 28, 2013

Compiling obj-c 2.0 with Foundation Kit on xubuntu 12.04 LTS with clang & llvm

This was tricky for me, so I am posting a guide as usual.

1. sudo apt-get install subversion
2. sudo apt-get install build-essential
3. sudo apt-get install pacman
4. sudo apt-get install libobjc2
5. sudo apt-get install clang

6. Then follow the instructions here:
        http://clang.llvm.org/get_started.html


Here is a sample program:

#import <Foundation/Foundation.h>

int main(int argc, const char * argv[])
{

    @autoreleasepool {
        
        // insert code here...
        NSLog(@"Hello, World!");
        
    }
    return 0;

}

Save it as main.m and to compile it do:

sudo clang main.m `gnustep-config --objc-flags` `gnustep-config --objc-libs` -x objective-c -fconstant-string-class=NSConstantString -fobjc-nonfragile-abi -fblocks -lgnustep-base -lgnustep-gui -ldispatch -I /usr/include/GNUstep -L /usr/lib/GNUstep

it will create a file called a.out, to run it do:

sudo ./a.out

References:
http://sohanikh.blogspot.com/2013/02/how-to-build-llvm-from-source-on-ubuntu.html
http://clang.llvm.org/get_started.html
http://stackoverflow.com/questions/14921482/clang-compiling-error-undefined-reference-to-objc-autoreleasepoolpush

Saturday, December 14, 2013

3930k GA-x79-UP5 Hackintosh 10.9 Mavericks

There was some trouble for me to get this up and running, so I am posting some clarifications on how to do it.

1. The ram that you choose doesn't matter, at least in my experience, I tried 4 different brands at different speeds and they all worked.
The motherboard does matter, I tried with an ASRock x79 Extreme4 and couldn't enter the installer.

2. I used 
tonymacx86's guide:
http://www.tonymacx86.com/374-unibeast-install-os-x-mavericks-any-supported-intel-based-pc.html

And Dingleberry's guide:
http://www.tonymacx86.com/user-builds/93089-new-success-dingleberrys-content-creator-build-ga-x79s-up5-x79-c606-i7-3930k-32gb-gtx670.html

4. For GPU I got a ASUS nvidia 240 gt off of ebay for 60$.
    For mobo I used GA-x79-UP5 off of ebay for 220$.
    For CPU 3930k
    Everything else choice doesn't matter(case,psu,hd etc)

5. When starting up, and you get to the screen where you can choose to boot from your usb stick, you need to type in 

-v GraphicsEnabler=No npci=0x3000 cpus=1

Then hit enter.
This isn't listed in the guide and is necessary to progress.

6. In verbose mode when you get to the part where it says cannot load bootcache just wait, it takes a little bit to progress to the next part.


7. After you go through the general guide you need to disable EIST in the bios, and then apply the VoodooTSCSync.kext using KextBeast, both are in Dingleberry's post. Disabling EIST will run your cpu at what you set it in the bios instead of 1.3Ghz, and VoodooTSCSync.kext is supposed to enable all six cores on the 3930k so you do not have to boot with cpus=1.

8. Setup I used:


9. Right now I am still booting with -v GraphicsEnabler=No npci=0x3000,
but you can edit the org.chameleon.Boot.plist, and put '-v GraphicsEnabler=No npci=0x3000' for the string under the 'Kernel Flags' key. Then you don't need to type anything when the comp boots up.


10. To get sound working use this link
http://www.tonymacx86.com/audio/99315-ga-x79s-up5-ml-10-8-3-3970x-no-sound.html


Good luck!


Saturday, December 7, 2013

BFL Jalapeno Xubuntu Mining

In April 2013, I saw that asics were shipping for mining bitcoin. I ordered a Jalapeno, which came in Sept 2013. After mining with it for about two weeks using cgminer for OSX I tried to sell it on ebay, but people would just keep bidding and not paying after the auction ended.

So I set it up on my linux server to mine and here are the steps to do it.

I had help from reading this guide, I am going to copy and paste some of the steps incase that page disappears so this guide doesn't become fragmented.

https://coinaxis.com/index.php/tutorials/entry/how-to-configure-linux-and-build-cgminer-for-bitcoin-and-litecoin

1. Create a usb install key for Xubuntu 12.04 using 'linux live usb creator' on Windows.
2. Install it on a pc and boot to it.
3. Open a Terminal window and type these commands

sudo apt-get install libcurl4-openssl-dev pkg-config libtool libncurses5-dev libudev-dev screen xterm
sudo apt-get install git-core
sudo apt-get install openssh-server byobu
sudo apt-get install autoconf
sudo apt-get install automake

git clone https://github.com/ckolivas/cgminer
cd cgminer
./autogen.sh

CFLAGS="-O2 -Wall -march=native" ./configure --enable-scrypt --enable-bflsc --enable-bitforce
sudo make
sudo make install

sudo usermod -G plugdev -a yourusernamehere

sudo cp 01-cgminer.rules /etc/udev/rules.d/

sudo reboot


4. After reboot open another terminal window and type


cd cgminer
./cgminer


5. Then enter in your pool information. If you want to mine bitcoin make an account at btcguild.com. I am going to use the asic to mine Peercoin and will evaluate some pools before I post one here.


Wednesday, June 26, 2013

Dormant Labs AC Wifi Outlet Setup


This guide will show how to setup the Dormant Labs AC Wifi Outlet. This outlet is an ac outlet that can be turned on and off from your wifi network.


1. The first step is to configure the outlet so it can connect to your wifi network. There is a switch on the side of the outlet, make sure it is in the left position. This sets the outlet to configuration mode.


2. Plug the outlet into power.


3. The outlet will blink the blue and amber lights up to 7 times as it runs it's boot sequence. Wait until this is done.


4. When in configuration mode, the outlet creates it's own wifi network. You need to have your computer connect to the outlet's wifi network to access the configuration page. Join the outlet's wifi network.


5. The outlet is configured through a URL. The format goes like this:


http://169.254.1.1/configure/yourSSIDName/wifipassword/last3digitsIPaddress


So if I wanted to setup the outlet to connect to my home wifi network I would gather my settings:

WifiNetwork = ASUS
WifiPassword = ASUS123
MyDesiredIP = 111 (so the final ip would be 192.168.1.111, it has to be 3 digits, starting from 101)

I could pick 168, 333, 222, etc if I wanted to.

Then I would go into a browser and enter in the url. This is the result page that I get. The outlet is configured.


6. Unplug the outlet


7. Now put the switch into the right position. This puts it in operational mode.


8. Re plug in the outlet


9. The outlet will blink the blue and amber lights up to 7 times as it connects to your wifi network.


10. You should now connect your computer to the same wifi network if you haven't yet.


11. Connect the output cable to the outlet.


12. For testing purposes I connect the outlet cord to a lamp.

13. Now to turn the outlet on and off, you open a browser and type in the following:

http://192.168.1.111/TurnOn
http://192.168.1.111/TurnOff

When the outlet is activated it has a green light that turns on.(It also turns on the connected lamp)


Remember, the address is 192.168.1.XXX , where XXX is the last three digits that you chose in the configuration step.

This outlet was designed to be easily configurable, and to be easily scriptable. Scripts on your computer can call the turnOn/turnOff URLs to activate and deactivate this ac wifi outlet.

Enjoy!

Saturday, April 27, 2013

Dell B1160W is OSX Compatible

I needed a printer, and picked the Dell B1160w from an online store for $69 + shipping.

My setup is a mac mini running OSX 10.8.2.

The setup procedure is very simple.

1. Download and install the drivers from  http://www.dell.com/support/drivers/us/en/19/DriverDetails?driverId=9CRK3. During the install process change the printer network settings to your wifi network's settings.

2. Go to Apple Menu>System Preferences then click on the Print and Scan Icon. Click on the 'plus' button, and select 'Dell B1160w Mono Laser Printer.'

You can now print a test from textedit.

It has support for wirelessly printing from a mobile device, but I haven't tried it yet.

I plan to use this printer to home print shipping labels for the arduino ph shields that I sell.


Wednesday, March 27, 2013

Getting started with a left 4 dead 2 server on vps

I decided to setup a dedicated left 4 dead server on a vps. I chose virpus as my vps host because they allow unmanaged which is cheap, and because they allow you to host your vps in Kansas. I wanted it as close as possible for a hopefully lower ping.

At first I got an openvz instance, but it's performance was so helter skelter that I decided to switch to a xen instance. 

Here are the instructions on how to set up a left 4 dead dedicated server on a virpus vps:

1. When you signup with virpus you get an email for setup. It tells you your name and password and then to login to manage.virpus.com.

2. Once you are in, go to controls>general>reinstall.

3. Pick Ubuntu 10.04 32 bit and install it. The install process takes around 10 minutes.

4. Go back to manage.virpus.com and then go to Controls>Root Password. Set a new root password.

4. After setting a new root password go to Controls>General>Reboot and reboot.

5. Now you can ssh into your server. Open terminal app(in OSX, if you are on windows use putty, if on linux it has its own terminal app) and type 'ssh root@yourserverip'

You will have to enter the password that you set in step 4.

After that type in these commands. 

cd /
mkdir left4dead2
cd left4dead2
 apt-get install wget
     Then finish the install process for wget

wget http://www.steampowered.com/download/hldsupdatetool.bin
cd ..
chmod 777 left4dead2
cd left4dead2
chmod +x hldsupdatetool.bin
./hldsupdatetool.bin

sudo apt-get update
sudo apt-get upgrade
chmod 777 steam
./steam -command update -game left4dead2 -dir .
         This command will take about 10 minutes to complete

./steam -command update -game left4dead2 -dir .
          Yes you do need to do this command twice, if it says the same thing, then run it again.

After it installs you can chmod the steam and hldsupdatetool back to 755 or lower.
To launch the server:

cd /
cd /left4dead2/left4dead2
./srcds_run -game left4dead2 -ip yourserveriphere


This should get you up and running. Administering a l4d2 server is a much broader topic, so I will leave that part for google.


UPDATE 4/27/2013

I should mention that I am no longer using virpus hosting because they are very unreliable. I bought one VM with them that was based off of OpenVZ. One day I could not complete a simple 'apt-get update' command, it would cause a kernel panic.

I switched over to a Xen instance, but again with nothing installed on a fresh OS, doing an 'uptime' command showed 100% cpu usage. I found and ran a bench.sh script(its on lowendbox.com) that also showed that my VM had less memory than virpus was advertising, around 60MB less.

There is also the part where whenever I would type 'uptime' it was always around 4 hours. The VM was getting rebooted several times per day, I assume from a crash.

I moved from virpus to a vm host called shardhost. Everything went fine until an angry gamer did a DDOS attack on my VM. After that shardhost did something that would shut down the srcds_run process whenever I would start it.

So I would avoid VPS hosting on virpus or shardhost if you are considering it.

Update 7/1/2013 I am leaving shardhost, my vps is almost always down. ugh
Update 7/22/2013 add digitalocean.com to the list of hosts to avoid


Saturday, February 23, 2013

DIY Arduino PH Controller Tutorial

Controlling the ph of a solution by hand is hard and tedious. It is a prime candidate for automation.

Lets go over the materials you will need to gather:

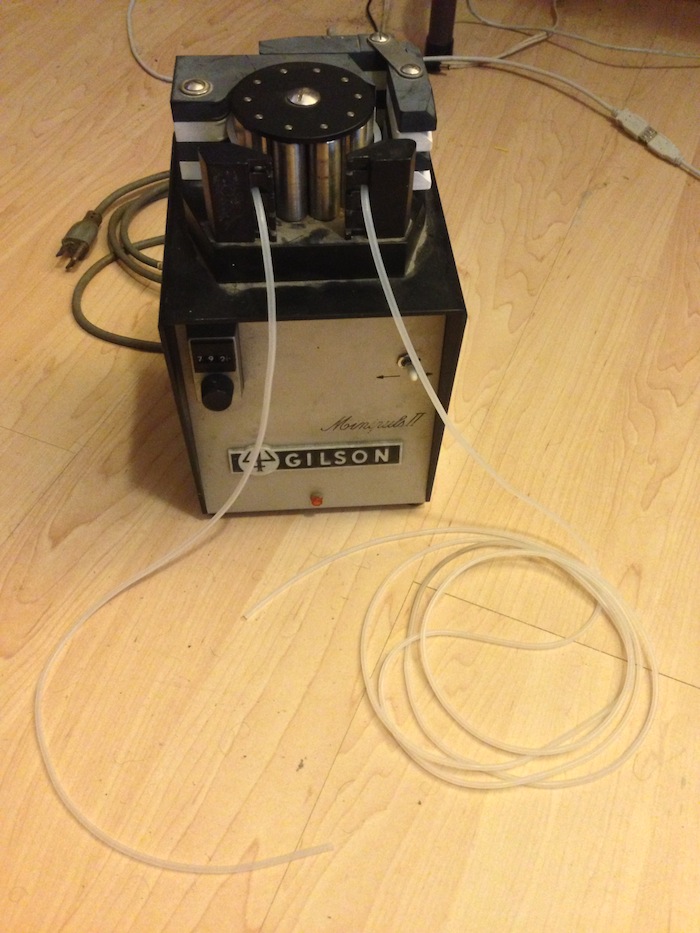
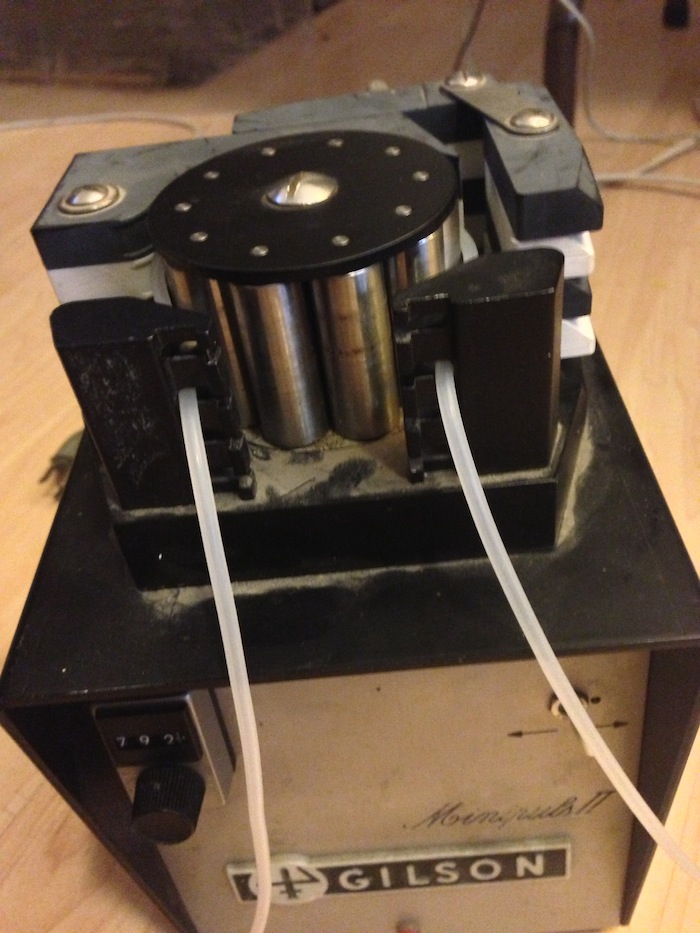
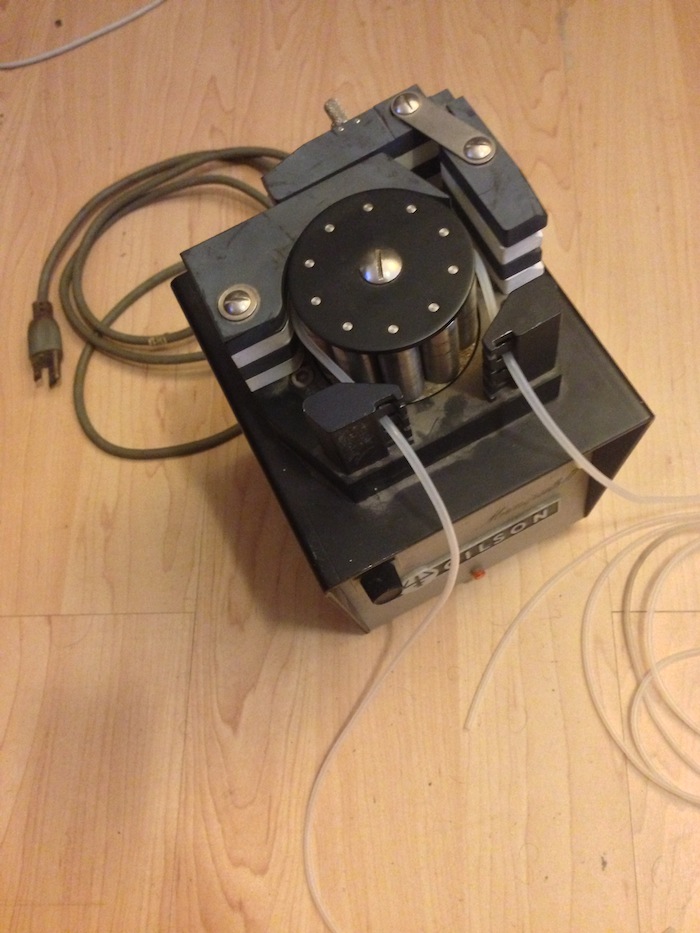
1. First you will need to buy a peristaltic pump. I bought mine off of ebay for 85$(You are saving money on anything that you get under $175 vs retail). To find them search "peristaltic pump" on ebay. Here are some pics of the one I bought. Make sure you buy a manual one, not one with it's own computer, because the pump will be controlled by an arduino.


Normally, in a ph solution, the ph if left alone will rise out of the desired range. To knock the ph back down we add an acid, which lowers the ph. Acids cause corrosion. For this reason a peristaltic pump is the correct answer for dosing acid because a peristaltic pump does not come in contact with the solution that it is pumping and less likely be corroded.

2. The second item you will need is peristaltic pump tubing. The peristaltic pump works by squeezing liquid through tubing. Here is some info about tubing. For my setup I used 1/16" ID x 1/8" OD 0.30" wall silicone tubing. You can search "1/16 id  1/8 od silicone tubing" on google and it will show up, but make sure you buy the correct tubing for your pump.


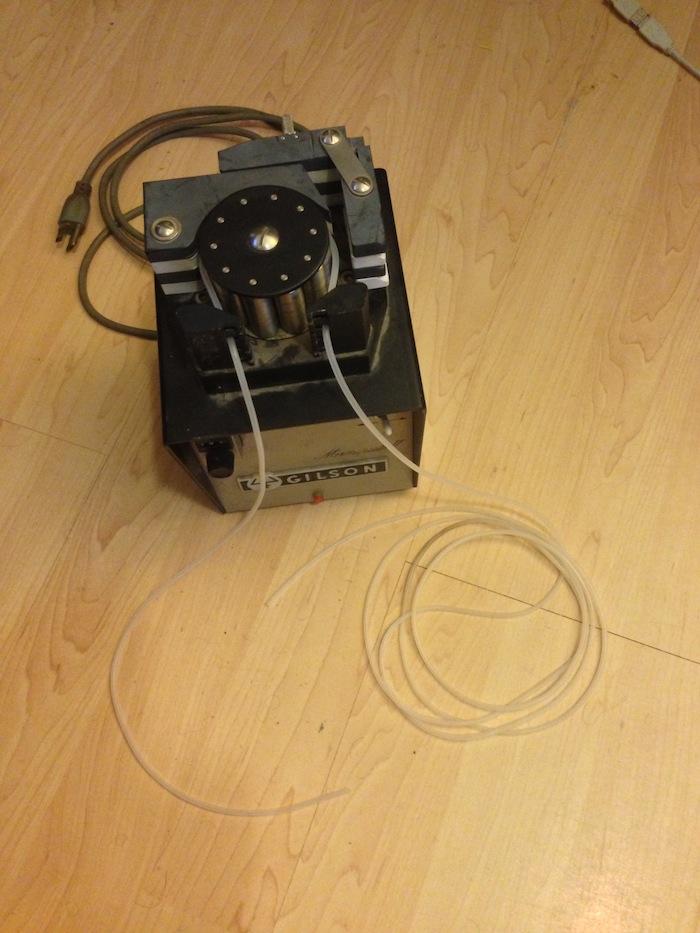
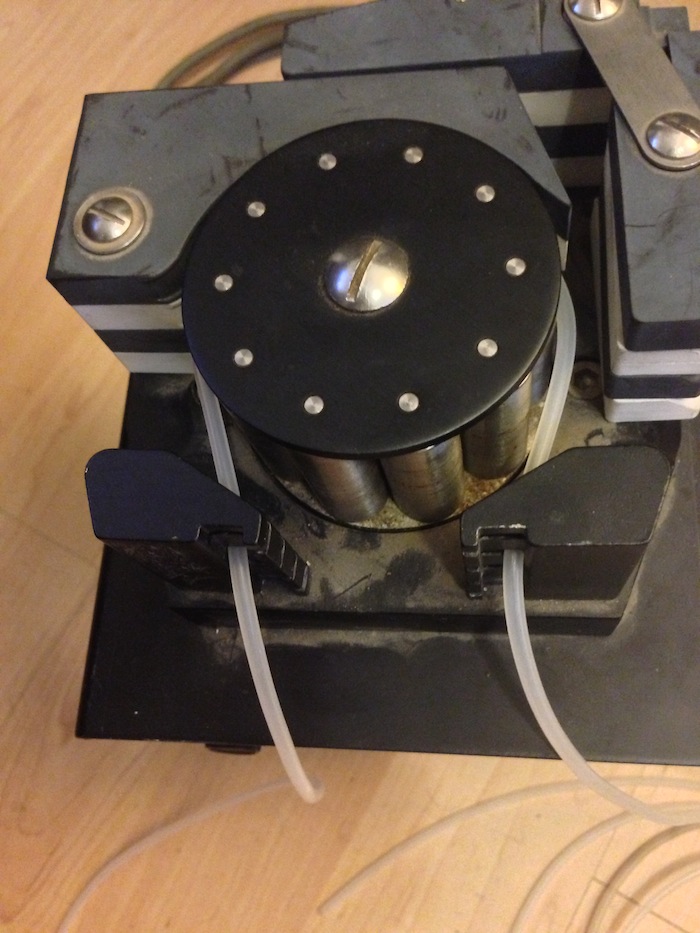
Here are some pics of the tubing installed in the pump. As you can see, when the pump is on, the head turns and squeezes liquid through the tube. The knob on the left controls the rate that the head spins at, and the switch controls the direction that the head rotates in.


3. The third item you need is a container that will hold the solution. I am using some glassware that I had Allen Scientific Glass in Boulder, Colorado make for me.


Remember that I said that the acids that are mixed into a solution to lower its ph are corrosive. Glass is a good pick for a container because it has a very good 'chemical resistance'. To see how it compares to other materials see this. For most chemicals, it shows no damage after 30 days, and for others only surface etching.

The acid I am using is labeled 'ph down'. I know from working with ph down that it is usually diluted phosphoric acid.

Looking at the sheet, Glass shows no damage after 30 days of exposure to Phosphoric Acid 5% and 85%. But if you pay attention the HDPE material also shows no damage after 30 days of exposure to Phosphoric acid 5% and 85%.

So if glass is too expensive, use HDPE.

HDPE buckets are readily available online. I might switch to using them if I need a larger container. I would recommend an HDPE bucket from an online diy home brewing store because they usually have a spigot, from which you can easily drain the bucket, or extract a portion of the solution. You can find these by searching google for 'fermenting bucket.' This is what searching "fermenting bucket with spigot" came up with:


4. The fourth item you will need is a ph probe. Aside from minor differences, all of them are the same. I am using this one, and I am using it specifically because it is threaded.


The reason I am using a threaded ph probe is because I can screw it into the glassware I had made. Im not going to take off the ph probe boot yet, but this is the part where it screws in.


5. You will need some 7.0 and 4.0 ph probe calibration fluid. You should buy some from the same place that you get your probe. But if you need a online source you can use omega.


6. This is the ph down that I am using. Use whatever is appropriate for your application.


7. A relay that can be controlled by a micro controller. I will be using this with an arduino to turn the peristaltic pump on and off.


8. An arduino, I am using a arduino uno.


9. A arduino ph shield. I make these and sell them here.


10. A arduino screw terminal shield. This will hold the wires in without soldering.


11. The last item you need is an lcd shield. I bought this on ebay, from seller emartee2009. The listing you should look for will be something like 'Nokia 5110 LCD Shield With SD -Arduino Compatible'.


I will be using the arduino and ph shield+probe to monitor the ph, display it on the lcd screen shield, and then control the ph by turning on the peristaltic pump that administers ph down into the container.

The next steps cover assembly and programming of the controller.

1. Insert the screw shield into the arduino uno.


2. Insert the ph shield on top of it.


3. Insert the lcd shield next.


4. Connect the ph probe.


5. Now connect the arduino to your computer via usb and start the arduino IDE. If you do not have the arduino IDE installed, go to the download page.

The first thing we need to do is install the library for the lcd shield to work.


Now we need to copy the library to the arduino library folder. It is in different locations on the windows version, osx version, and linux version.

On OSX, you need to show package contents on the arduino.app file.
Then the libraries folder is located in 
Contents > Resources > Java > Libraries

Alternatively, you can also create a library folder in the Home > Documents > Arduino folder.


Copy the extracted LCD5110 folder to the arduino libraries folder.


On windows and linux you will have to find out where the arduino libraries folder is. I know that when you download the windows version the arduino ide is in a folder, so it should be somewhere under that folder.

6. Now we make sure the LCD works by itself first. Open the Arduino IDE if you do not have it running and select the LCD example:


Make sure your arduino is connected to your computer by usb then hit upload.


You should see the result on the LCD.


Once you have verified the LCD works, then you can proceed.


7. Now it is time to load the full program and set it up. Create a new sketch and paste the following code in to it:


#include <EEPROM.h>
#include <LCD5110.h>

//My scratch notes
//measuredPH-6.8580 roomTempMeasuredPH-6.8965 
//tempC-28.0195 phVolts-2.3535 7CalVolts-2.3047 4CalVolts-3.3594 4CalTempAdjusted-3.9640


//float volt4 = 3.359;
//float volt7 = 2.304;
//float calibrationTempC = 21;

float volt4 = 3.341;
float volt7 = 2.304;
float calibrationTempC = 31.1;


//A3 = temp
//A2 = PH
//CALIBRATE = D8
int phPin = A2;
int tempPin = A3;
int calPin = 8;
int relayPin =13;

void setup()
{
    LcdInitialise();
    LcdClear();
    Serial.begin(9600);
    
    pinMode(relayPin,OUTPUT);
    digitalWrite(relayPin,LOW);
}

float measurePHVolts()
{
    float phADC = analogRead(phPin);
    float phVolts = (phADC/1024.0)*5.0;
    return phVolts;
}

float getTempAdjusted4()
{
    //http://www.omega.com/Green/pdf/pHbasics_REF.pdf
    float adjustTemp = calibrationTempC;
    float difference = adjustTemp-25;
    float phAdjust = (0.009 * difference);
    float tempAdjusted4 = 4 + phAdjust;
    return tempAdjusted4;
}

float measurePH()
{
    
    float phVolt = measurePHVolts();
      
    float tempAdjusted4 = getTempAdjusted4();
    float voltsPerPH = (abs(volt7-volt4)) / (7-tempAdjusted4);
  
    //acid ph's produce positive voltages, basic ph's produce negative voltages
    //that one site was wrong
    
    float realPHVolt = (volt7 - phVolt);
    float phUnits = realPHVolt / voltsPerPH;
    float measuredPH = 7 + phUnits;
    
    return measuredPH;
}

float doPHTempCompensation(float PH, float temp)
{
    float difference = temp-25;
    float phAdjust = (0.009 * difference);
    float tempAdjustedPH = PH + phAdjust;
    return tempAdjustedPH;
}


float measureTempC()
{
    float tempADC = analogRead(tempPin);
    float tempVolts = (tempADC/1024)*5.0;
    float tempC = (tempVolts/0.010);
    return tempC; 
}


// floatToString.h
//
// Tim Hirzel
// tim@growdown.com
// March 2008
// float to string
// 
// If you don't save this as a .h, you will want to remove the default arguments 
//     uncomment this first line, and swap it for the next.  I don't think keyword arguments compile in .pde files

//char * floatToString(char * outstr, float value, int places, int minwidth=, bool rightjustify) {
char * floatToString(char * outstr, float value, int places, int minwidth=0, bool rightjustify=false) {
    // this is used to write a float value to string, outstr.  oustr is also the return value.
    int digit;
    float tens = 0.1;
    int tenscount = 0;
    int i;
    float tempfloat = value;
    int c = 0;
    int charcount = 1;
    int extra = 0;
    // make sure we round properly. this could use pow from <math.h>, but doesn't seem worth the import
    // if this rounding step isn't here, the value  54.321 prints as 54.3209

    // calculate rounding term d:   0.5/pow(10,places)  
    float d = 0.5;
    if (value < 0)
        d *= -1.0;
    // divide by ten for each decimal place
    for (i = 0; i < places; i++)
        d/= 10.0;    
    // this small addition, combined with truncation will round our values properly 
    tempfloat +=  d;

    // first get value tens to be the large power of ten less than value    
    if (value < 0)
        tempfloat *= -1.0;
    while ((tens * 10.0) <= tempfloat) {
        tens *= 10.0;
        tenscount += 1;
    }

    if (tenscount > 0)
        charcount += tenscount;
    else
        charcount += 1;

    if (value < 0)
        charcount += 1;
    charcount += 1 + places;

    minwidth += 1; // both count the null final character
    if (minwidth > charcount){        
        extra = minwidth - charcount;
        charcount = minwidth;
    }

    if (extra > 0 and rightjustify) {
        for (int i = 0; i< extra; i++) {
            outstr[c++] = ' ';
        }
    }

    // write out the negative if needed
    if (value < 0)
        outstr[c++] = '-';

    if (tenscount == 0) 
        outstr[c++] = '0';

    for (i=0; i< tenscount; i++) {
        digit = (int) (tempfloat/tens);
        itoa(digit, &outstr[c++], 10);
        tempfloat = tempfloat - ((float)digit * tens);
        tens /= 10.0;
    }

    // if no places after decimal, stop now and return

    // otherwise, write the point and continue on
    if (places > 0)
    outstr[c++] = '.';


    // now write out each decimal place by shifting digits one by one into the ones place and writing the truncated value
    for (i = 0; i < places; i++) {
        tempfloat *= 10.0; 
        digit = (int) tempfloat;
        itoa(digit, &outstr[c++], 10);
        // once written, subtract off that digit
        tempfloat = tempfloat - (float) digit; 
    }
    if (extra > 0 and not rightjustify) {
        for (int i = 0; i< extra; i++) {
            outstr[c++] = ' ';
        }
    }


    outstr[c++] = '\0';
    return outstr;
}


void loop()
{
    int x;
    int sampleSize = 500;

    float avgMeasuredPH= 0;
    float avgRoomTempMeasuredPH =0;
    float avgTemp = 0;
    float avgPHVolts =0;
    float avgVoltsPerPH =0;
    float phTemp = 0;
 
    
    float tempAdjusted4 = getTempAdjusted4();

    for(x=0;x< sampleSize;x++)
    {

        float measuredPH = measurePH();
        float phTemp = measureTempC();
        float roomTempPH = doPHTempCompensation(measuredPH, phTemp);
       
        float phVolt = measurePHVolts();

        avgMeasuredPH += measuredPH;
        avgRoomTempMeasuredPH += roomTempPH;
        avgTemp += phTemp;
        avgPHVolts += phVolt;
    }

    avgMeasuredPH /= sampleSize;
    avgRoomTempMeasuredPH /= sampleSize;
    avgTemp /= sampleSize;
    avgPHVolts /= sampleSize;
    
    Serial.print(" measuredPH-");
    Serial.print(avgMeasuredPH,4);
    Serial.print(" roomTempMeasuredPH-");
    Serial.print(avgRoomTempMeasuredPH,4);
    Serial.print(" tempC-");
    Serial.print(avgTemp,4);
    Serial.print(" phVolts-");
    Serial.print(avgPHVolts,4);
    Serial.print(" 7CalVolts-");
    Serial.print(volt7,4);
    Serial.print(" 4CalVolts-");
    Serial.print(volt4,4);    
    Serial.print(" 4CalTempAdjusted-");
    Serial.println(tempAdjusted4,4);
    
    
    drawBox();
    char charBuffer[25];
    gotoXY(5,1);
    LcdString("PH:");
    gotoXY(30,1);
    floatToString(charBuffer,avgRoomTempMeasuredPH,2);
    LcdString(charBuffer);
    
    gotoXY(4,2);
    LcdString("TempC: ");
    gotoXY(45,2);
    floatToString(charBuffer,avgTemp,1);
    LcdString(charBuffer);
  
    gotoXY(4,3);
    LcdString("V:");  
    gotoXY(20,3);
    floatToString(charBuffer,avgPHVolts,3);
    LcdString(charBuffer);
  
    if(avgMeasuredPH > 5.9)
    {
      digitalWrite(relayPin,HIGH);
      gotoXY(4,4);
      LcdString("dosing on");
    }
    else
    {
      digitalWrite(relayPin,LOW);
      gotoXY(4,4);
      LcdString("dosing off");
    }


}


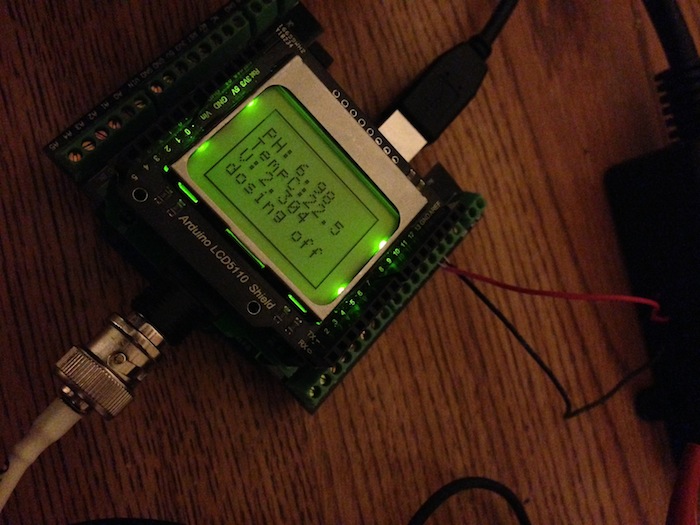
Connect your ph probe, and after clicking upload you should see a screen like this:


8. Now we calibrate the ph probe. The reason we need to calibrate is because ph probes age. Normally they output a certain +-mv per ph, but over time this drifts. Calibration overcomes this inconvenient fact of life. Here I have the ph 4.01 calibration solution on the left, tap water(If you have distilled water that is better) in the middle, and ph 7.0 calibration on the right.


First rinse your ph probe in the tap water.


Then dip your ph probe in the 7.0 solution and write down the voltage value. It is 2.304 volts.


Now re-rinse the probe.


The next step is to dip your probe in the 4.0 calibration solution. Write down the volts and temperature. So 3.341 volts and 31.1C. As you can see my thermostat kicked in.

Since temperature has no effect on ph at ph 7, we do not record it then. Temperature does affect the 4.0 ph measurement however, so we write it down.


Now we will plug the values that we wrote down into the program. Find the following variables:


We need to change them to the values that we just measured.

volt4 = 3.341;
volt7 = 2.304;
calibrationTempC = 31.1;


Then press upload. This completes the calibration.


9. Step nine is to attach the relay to the arduino. You will need a 5/64" screwdriver for this part.


Wire the terminal labeled "+in" on the relay to pin 13 on the arduino. Wire the terminal labeled "-in" on the relay to GND on the arduino.


10. Now that we have the relay connected, we alter the code for when to turn the relay on. At the bottom of the code there is this snippet:

Since I will be growing hydroponic strawberries in coco this summer(hopefully) a ph of 5.5-6.2 is the best range for me.

11. The rest of the steps are just assembly. Connect the relay to the peristaltic pump, connect the other end of the relay to power. Mount the ph probe into the solution container. Connect the peristaltic pump tubing to the ph down.


Yes of course I took a video :)

The reason the fluid in the video goes back and forth is because I tightened the peristaltic pump too tight around the tubing.

Also in the video the ph goes up at first because I just connected the probe and it still had a coating of 4.0 calibration solution on it.

I will rearrange the items a bit, and switch to using a wireless outlet to turn the peristaltic pump on and off.